3 Get your team up and running
By creating a team in Microsoft Teams, you create a place for the members of your team to communicate and collaborate digitally. To get your team up and running, you'll need to create a team, add people, and add channels. In this unit, you'll learn how to create your team, add members and guests, and create public and private channels.
Create a team
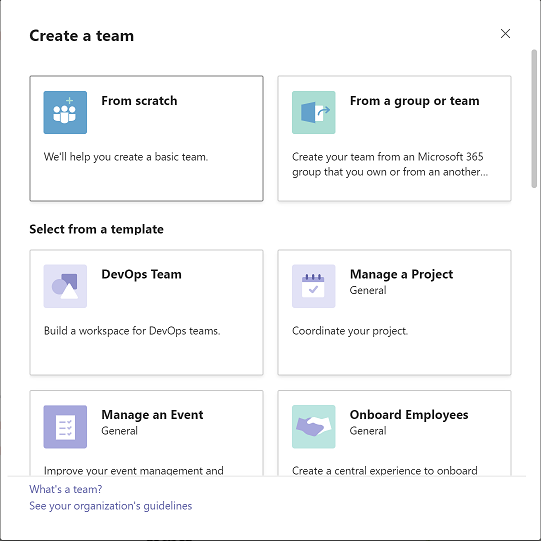
To create a new team, first select Teams in the menu to the left, then select Join or create a team. The page that follows will display teams that you have access to join, in addition to the option to create a new team.
When you select Create team, you will have the following options:

- Create a team from scratch. This allows you the most control over how your team is organized and set up. You will be asked to provide a name and optional description for the team. When your team is created, you'll get a corresponding Microsoft 365 group, which includes a group inbox and calendar in Outlook, a SharePoint site, and OneNote.
- Create a team from an existing group or team. When you create a team from an existing Microsoft 365 group or team that you own, you'll automatically share the same name, group privacy (public or private) and members as the original group. You may choose not to copy members from your existing team to the new team, and add members manually later. Note that you will still need to configure settings for your new team, including apps and tabs.
- Create a team from a template. Choose from a growing library of templates to help you set up a team quickly and easily with predefined channels, tabs, and apps that work together to support your new team. Current templates include project management, event management, retail services, financial collaboration, government communications, healthcare, and more—with additional templates to come. Admins can also create custom templates for your organization. Once you select a template, you will be able to name your team, provide an optional description, and rename the provided channels to customize them for your team.
The teams you create can be public or private:
- To limit content and conversation to a specific set of people, choose Private.
- For a community or topic that anyone in the organization can join, choose Public.
Add members
Once you have a team, you automatically become a team owner. Next, you can add members or invite people to join. (Only team owners can add members).
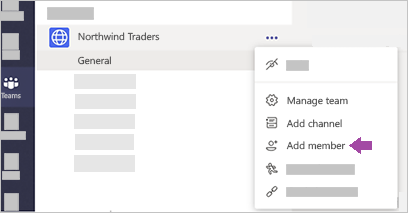
To add members to a team, go to the team name in the teams list and select More options  > Add member.

You can add people, groups, or even entire contact groups. People you add to a team will receive an email letting them know they are now a member of your team and the team will show up in their teams list.
Add guests
Sometimes you'll want to collaborate with people who aren't in your team’s organization. In that case, you can add them as a guest. Guests have fewer capabilities than team members or team owners, but there's still a lot they can do.
To invite someone from outside your organization to join your team, go to the team name in the teams list and select **More options  > Add member. Use their email address to invite them as guests. You can add a friendly display name for guests outside of your org. If you don't add a friendly name when you initially add the guest, you will need an IT admin to help if you want to do it later.
Guests must have a Microsoft 365 work or school account. If the guest doesn’t yet have a Microsoft account associated with their email address, they will be directed to create one for free. Once you add the guest, they will receive a welcome email invitation that includes some information about joining Teams and what the guest experience is like.
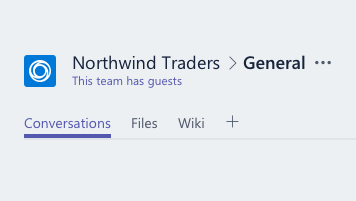
You can tell if someone is a guest by looking anywhere their name appears—the word “Guest” appears after it. If your team has guests, it will be noted under the team name in Teams.

Create channels
Once you've set up your team, you'll want to set up channels related to the team's needs. People create channels for the topics that make sense for their team. These topics could be projects, department names, issues - whatever your team needs. By default, every team gets a General channel. This is a good channel to use for information or announcements that the whole team needs.
To create a new channel, select More options  next to the team name, then Add channel. Give the channel a name and description and then determine if the channel should automatically be visible in everyone’s channel list.
Channels have tabs within them. You'll learn how to add apps and files as tabs in your channels later in this module.
Private channels
Most channels are public channels - everyone on the team can see them as well as view and participate in conversations, share files, and more.
If you need to have focused, private conversations with people on your team, create a private channel. With a private channel, members of a team must be specifically added to it to participate, see content, and to see the channel appear in their list of channels. You might want to use a private channel if you want to limit collaboration to those who have a need to know or if you want to facilitate communication between a group of people assigned to a specific project, without having to create an additional team to manage.
For example, a private channel is useful in these scenarios:
- A group of people in a team want a focused space to collaborate without having to create a separate team.
- A subset of people in a team wants a private channel to discuss sensitive information, such as budgets, resourcing, strategic positioning, and so on.
A lock icon indicates a private channel. Only members of private channels can see and participate in private channels that they are added to. Team owners can see a list of all private channels in their team, but will not be able to see the files in a private channel or the conversations and member list of a private channel unless they are members of that private channel.
When a private channel is created, it's linked to the parent team and can't be moved to a different team. Additionally, private channels can't be converted to standard channels and vice versa.
Create a private channel
To create a private channel, go to a team you want to create a channel for and select More options  > Add channel, just as you would for a public channel.
To make the channel private, under Privacy, select the down arrow and choose Private - Accessible only to a specific group of people within the team. After you add a name and description as you would for a public channel, you will be able to enter the names of people you'd like to invite to the private channel, including guests.
People you've added will see the channel appear in their channel list with a lock icon next to the name to signal that the channel is private.
- People must already be members or guests of a team to be added to a private channel.
- Team owners can create private channels, and allow members to create them. Whoever creates a private channel can add people to it.
Related articles
-
Page:
-
Page:
-
Page:
-
Page:
-
Page: